I've just published a Xojo / Real Studio class for doing smooth fade/mode/resize animations with windows and controls.
Find out more about it here: http://www.tempel.org/RB/CocoaAnimation.
Showing posts with label Cocoa. Show all posts
Showing posts with label Cocoa. Show all posts
18 May 2014
26 March 2014
Customizing Xojo's controls on OS X with Cocoa
This article is about some advanced techniques for Xojo users that write OS X Cocoa apps.
If you are using Xojo to build OS X Cocoa applications, you can customize the controls much further than Xojo offers directly.
Let's take the PopupMenu. It's fairly limited in appearance (one look only) and capabilities (no icons in the menu, for instance).
Changing the appearance of such a control is easy because for most of Xojo's controls there is a Cocoa control equivalent, and you can directly alter those Cocoa controls from your code.
First, find out what you like to change in a control. You could look up Apple's documentation for the NSPopupButton, for instance. An easier way is to use Xcode as you can then see immediately the results in Xcode's interface designer.
Get Xcode from developer.apple.com, launch it, and choose New Project... from the menu.
Choose OS X - Application - Cocoa Application. Click Next. Give the project a name and check "Create Document-Based Application". Click Next and save it, e.g. to the Desktop.
In the browser menu on the left, select "Document.xib". That will show you the window editor, similar to Xojo's layout editor.
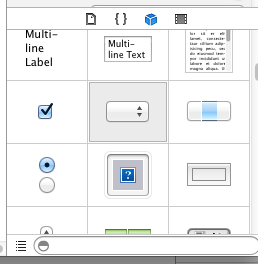 At the right of the Xcode window, at the bottom, there is a list of controls to choose from:

Click on the added button to select it, and on right side of the Xcode window, click on the properties button (the one shown in blue here).
You will see the various properties you can alter.

For example, let's change the Style to Inline. Do that and see how the appearance of the popup menu changes:
Now let me show you how to do that in your Xode program.
I assume you know how to add a PopupMenu control to a window in Xojo.
Add an Open event to the PopupMenu in the window, and add the following code:
Declare Sub setBezelStyle Lib "Cocoa" _
Selector "setBezelStyle:" (obj as Integer, v as Integer)const NSInlineBezelStyle = 15
setBezelStyle (me.Handle, NSInlineBezelStyle)
If you run your Xojo project, the popup button should now have the changed appearance.
However, it might be that the up+down arrows are centered, not on the right as they should. If you look at the Xcode project and play around with the settings for the Popup control, you'll see that the Arrow property controls this - if it's set to "Center", it's placing the arrows in the center. Let's see if we can fix the Popup menu in Xojo to have its Arrows set to "Bottom" instead. Add these lines:
Declare Sub setArrowPosition Lib "Cocoa" Selector "setArrowPosition:" (obj as Integer, v as Integer)
Declare Function cell Lib "Cocoa" Selector "cell" (obj as Integer) as Integer
const NSPopUpArrowAtBottom = 2
setArrowPosition (cell (me.Handle), NSPopUpArrowAtBottom)
Now I'll explain what's going on:
setBezelStyle is a function of NSButton, which is the super class of NSPopUpButton. Unfortunately, Xcode does not tell us that its "Style" property is actually called "bezelStyle", so I had to search the documentation for it anyway. me.Handle is the Xojo control's reference to the Cocoa object (i.e. the NSPopUpButton object), and we've then declared a Xojo function with the name setBezelStyle that invokes the "setBezelStyle:" selector, passing it an Integer value. Note that for every Cocoa property you find, there is always a setter function named after this pattern, e.g. "name" -> "setName:".
Getting access to the Arrow property was a little more complicated. Neither NSPopUpButton nor any of its super classes provides a function to set this property. Instead, it's found in the NSPopUpButtonCell class. To get to values of this class, we need to use the cell function (found in the NSControl class).
If you do not like to figure all this out yourself, you can also take a look at MacOSLib or use the MBS plugins. Especially with MBS it's very easy to acess these Cocoa control properties or add icons to a PopupMenu's items.
But wait, there's more!
This is getting pretty advanced now.
Cocoa is built on Objective C, which, contrary to C++ and Xojo, lets you get right down to the lowest level where you can call functions (called messages in ObjC) by name. From a String.
Which means that you can store the function name you want to call in a String, or even read it from a file, and then invoke it.
Here's an example to show you what I mean. The above code for setting the style could also be written like this:
Declare Function NSSelectorFromString Lib "Cocoa" _
(aSelectorName as CFStringRef) As Ptr
Declare Sub objc_msgSend_int Lib "Cocoa" Alias "objc_msgSend" _
(obj as Integer, sel as Ptr, v as Integer)
dim f as String = "setBezelStyle:"
objc_msgSend_int (me.Handle, NSSelectorFromString(f), NSInlineBezelStyle)
See how "setBezelStyle:" is stored in a string variable here?
This Cocoa control also has an "alignment", so let's try altering that as well. The function name to change the value is thus "setAlignment:" (the ":" at the end is important and specifies that the function gets one value passed to it). So add this code:
dim f as String = "setAlignment:"
objc_msgSend_int (me.Handle, NSSelectorFromString(f), 1)
And with that, we've right-aligned the text in the popup menu.
With this procedure, you could now define customizations for your Xojo/Cocoa controls by specifying the properties and values in a file, and generically assign those properties in your code, without the need to write a special case for every property you might want to change.
Demo project!
Click here to download a demo project using above techniques.
06 August 2013
Xojo - Using MsgBox from a thread
I recently needed to debug some threaded REALbasic code. I could not use the IDE debugger because the issue I had occured only in built apps. Even worse, I needed to stop the thread at certain places so that I could investigate what it had done so far (i.e. writing a file, and looking at the data written).
An easy way to do this usually is to use MsgBox - it stops the code execution until you press the OK button.
However, calling MsgBox from within a thread is not working, at least not when building for Cocoa.
The solution is to put the thread to sleep temporarily, then have non-threaded code call MsgBox, and when that's done, wake up the thread again.
To put your own thread to sleep, call App.CurrentThread.Suspend.
To wake it up again, call its Resume function.
Here's a code example of how I solved this. Place both methods into a Module, and invoke MsgBoxFromThread from your thread.
An easy way to do this usually is to use MsgBox - it stops the code execution until you press the OK button.
However, calling MsgBox from within a thread is not working, at least not when building for Cocoa.
The solution is to put the thread to sleep temporarily, then have non-threaded code call MsgBox, and when that's done, wake up the thread again.
To put your own thread to sleep, call App.CurrentThread.Suspend.
To wake it up again, call its Resume function.
Here's a code example of how I solved this. Place both methods into a Module, and invoke MsgBoxFromThread from your thread.
Sub MsgBoxFromThread(msg as String)
  // Invoke this method to use MsgBox from within a thread.

  // Note: This is not multi-thread-safe! I.e, if you have more
  // than one thread from which you invoke this function, the
  // code needs to move away from single global/static variables
  // and instead maintain a queue for the threads and their
  // respective messages to be shown.
// (See the "Tasks" project from the Xojo Examples to learn
  // how to maintain such a queue).

  dim currentThread as Thread = App.CurrentThread
  if currentThread = nil then
    // the main thread is active - we can simply call MsgBox here
    MsgBox msg
    return
  end if

  // Create a timer for executing the MsgBox instruction
  // and waking up the thread afterwards again
  static t as Timer
  if t = nil then
    t = new Timer
    AddHandler t.Action, AddressOf MsgBoxFromThreadShow
    t.Period = 0
  end if

  // Store the msg and thread for the Timer
  mMsg = msg
  mThread = currentThread

  // Start the timer and put this thread to sleep
  t.Mode = 1
  currentThread.Suspend
End Sub

Private Sub MsgBoxFromThreadShow(t as Timer)
  MsgBox mMsg
  // Once MsgBox is finished, wake up the thread again:
  mThread.Resume
End Sub
Subscribe to:
Posts (Atom)