26 November 2014

Making CUPS printer drivers work again on OS X Yosemite (OS X 10.10)

I recently found out that some printer drives using the CUPS printing system stopped working on OSX 10.10 (Yosemite) that worked fine with the previous OSX Mavericks (10.9).

After some googling around I found various suggestions, but none seemed to help. In the end, it turned out that I had to follow THREE different suggestions to make it work. To save you the same odysee, here's my recipe for making printer drivers work again that stopped working on Yosemite:
  1. Remove any troublesome printers from the "Printers & Scanners" System Preferences.
  2. Re-Install the printer driver.
  3. Fix the permissions of the installed cups drivers by starting the "Disk Utility" program, selecting the startup disk and clicking on "Repair Disk Permissions".
  4. Turn off the tighter Sandboxing checks in Yosemite with these two Terminal commands:
    • sudo sh -c 'echo "Sandboxing Relaxed" >> /etc/cups/cups-files.conf'
    • sudo launchctl stop org.cups.cupsd
  5. Connect the printer and re-add the printer in the "Printers & Scanners" settings.
Hope this helps. If it does, please spread the word. If it doesn't, let me know please.

And, if you found this useful, also check out some other work of mine, such as:

  • Find Any File - The program that finds the files that Spotlight doesn't.
  • iClip - Improves the workflow with text snippets and the clipboard in general.

04 November 2014

Find Empty Folders - a free OS X tool

Today someone asked me if I knew a way to find and delete empty folders, even if they contain an invisible .DS_Store file.

I googled and found nothing.

So I quickly whipped something out with Real Studio.

The result can be found here:

http://www.tempel.org/FindEmptyFolders

18 July 2014

Something adventurous for a change (Nelly Cootalot)

Today I'm just helping promote someone else's work.

With this blog being directed mainly to other (programming) geeks, I think you might even be the right audience:

Did you enjoy playing Monkey Island, Leisure Suit Larry and other funny point-and-click adventures? (Though, the first Larrys I played were running still on DOS, without mouse support.)

And do you enjoy british humour?

And, possibly, are you on Steam?

Then have a look at this hilarious Nelly Cootalot promo!

The game is designed by a british film maker, and it's not his first go at an adventure, however this one is made much more professionally. Support his quest for getting the game onto Steam - don't be a coward!

I support this because long time friends of mine are involved in the development and distribution, and at some time I was almost becoming part of the dev team as well. I'd have loved to but I'm already busy with so many other projects I couldn't take on another one.

The game already got its basic funding through Kickstarter earlier this year, and now this is a step up to get onto Steam, giving it a much wider reach.

Also, it'll run on Macs, which is always good.

07 July 2014

OS X: Moving Files to Trash from your own application, with optional user interaction!

When you're writing a interactive Mac OS X program, it's possible that you need to delete files.

And if they're files the user has access to, then it's often a good idea to move them to the trash instead of erasing them right away, in order to give the user the opportunity to restore them again (saving you the need to provide some kind of Undo command for the destructive operation).

Moving items to the Trash is rather complex, and so it's best to just let the Finder perform that task.

The Finder is, fortunately, still scriptable, and so this task should be easy. (I must say, though, that I don't know if you can get such an app into the App Store - if you know, please comment.)

The challenge is to have the Finder tell the user if there's a problem, such as when the item is locked or when an admin login is needed.


Now, if you're trying to be lazy, you'd just write an AppleScript and invoke that from your application (this is especially easy to do in Real Studio / Xojo, but not much harder in ObjectiveC, either).

The downside of using an AppleScript is that it won't show these dialogs - if the item can't be moved to the trash, the function will return and give you an error message telling you about the problem.

To solve this, you need to invoke the AppleEvent directly, without going through an AppleScript.

The Xojo code would look like this, simplified:

  dim ae as AppleEvent = NewAppleEvent ("core", "delo", "MACS")
  dim list as new AppleEventDescList
  list.AppendFolderItem (theItemToDelete)
  ae.DescListParam("----") = list
  ok = ae.send

However, this won't give us the user interaction either, yet. That's because Xojo's Send command is lacking the options that the OS X API offers.

We have to call the native AESend() function via a declare, instead:

  const kAEWaitReply = &h00000003 ' sender wants a reply and will wait
  const kAEAlwaysInteract = &h00000030 ' interact where appropriate
  const kAECanSwitchLayer = &h00000040 ' interaction may switch layer
  declare function AESend lib "Carbon" (ae as Integer, reply as Ptr, 
    sendMode as Integer, prio as Integer, timeoutTicks as Integer,
    idle as Ptr, filter as Ptr) as Integer
  dim sendMode as Integer
  sendMode = kAEWaitReply + kAEAlwaysInteract + kAECanSwitchLayer
  dim err as Integer = AESend (ae.Ptr, nil, sendMode, 0, 0, nil, nil)
        
The same can be applied to copying files with user interaction as well - use the "clon" instead of the "delo" value for the AppleEvent.

I've made a REALbasic / Xojo project with both a MoveItemsToTrash() and CopyItems() function for your own use. Download here.

18 May 2014

Using the Cocoa animation API with Xojo

I've just published a Xojo / Real Studio class for doing smooth fade/mode/resize animations with windows and controls.

Find out more about it here: http://www.tempel.org/RB/CocoaAnimation.

26 March 2014

Customizing Xojo's controls on OS X with Cocoa

This article is about some advanced techniques for Xojo users that write OS X Cocoa apps.


If you are using Xojo to build OS X Cocoa applications, you can customize the controls much further than Xojo offers directly.

Let's take the PopupMenu. It's fairly limited in appearance (one look only) and capabilities (no icons in the menu, for instance).

Changing the appearance of such a control is easy because for most of Xojo's controls there is a Cocoa control equivalent, and you can directly alter those Cocoa controls from your code.

First, find out what you like to change in a control. You could look up Apple's documentation for the NSPopupButton, for instance. An easier way is to use Xcode as you can then see immediately the results in Xcode's interface designer.

Get Xcode from developer.apple.com, launch it, and choose New Project... from the menu.
Choose OS X - Application - Cocoa Application. Click Next. Give the project a name and check "Create Document-Based Application". Click Next and save it, e.g. to the Desktop.

In the browser menu on the left, select "Document.xib". That will show you the window editor, similar to Xojo's layout editor.
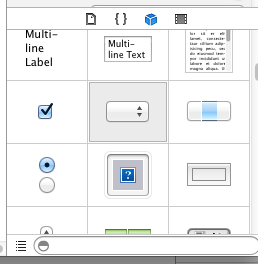
At the right of the Xcode window, at the bottom, there is a list of controls to choose from:

Find the "Pop Up Button" and drag it into the layout window. The window should then look like this:


Click on the added button to select it, and on right side of the Xcode window, click on the properties button (the one shown in blue here).

You will see the various properties you can alter.
For example, let's change the Style to Inline. Do that and see how the appearance of the popup menu changes:


Now let me show you how to do that in your Xode program.


I assume you know how to add a PopupMenu control to a window in Xojo.

Add an Open event to the PopupMenu in the window, and add the following code:

  Declare Sub setBezelStyle Lib "Cocoa" _
    Selector "setBezelStyle:" (obj as Integer, v as Integer)
  
  const NSInlineBezelStyle = 15
  
  setBezelStyle (me.Handle, NSInlineBezelStyle)

If you run your Xojo project, the popup button should now have the changed appearance.

However, it might be that the up+down arrows are centered, not on the right as they should. If you look at the Xcode project and play around with the settings for the Popup control, you'll see that the Arrow property controls this - if it's set to "Center", it's placing the arrows in the center. Let's see if we can fix the Popup menu in Xojo to have its Arrows set to "Bottom" instead. Add these lines:

  Declare Sub setArrowPosition Lib "Cocoa" Selector "setArrowPosition:" (obj as Integer, v as Integer)
  Declare Function cell Lib "Cocoa" Selector "cell" (obj as Integer) as Integer
  
  const NSPopUpArrowAtBottom = 2
  
  setArrowPosition (cell (me.Handle), NSPopUpArrowAtBottom)

Now I'll explain what's going on:

setBezelStyle is a function of NSButton, which is the super class of NSPopUpButton. Unfortunately, Xcode does not tell us that its "Style" property is actually called "bezelStyle", so I had to search the documentation for it anyway. me.Handle is the Xojo control's reference to the Cocoa object (i.e. the NSPopUpButton object), and we've then declared a Xojo function with the name setBezelStyle that invokes the "setBezelStyle:" selector, passing it an Integer value. Note that for every Cocoa property you find, there is always a setter function named after this pattern, e.g. "name" -> "setName:".

Getting access to the Arrow property was a little more complicated. Neither NSPopUpButton nor any of its super classes provides a function to set this property. Instead, it's found in the NSPopUpButtonCell class. To get to values of this class, we need to use the cell function (found in the NSControl class).

If you do not like to figure all this out yourself, you can also take a look at MacOSLib or use the MBS plugins. Especially with MBS it's very easy to acess these Cocoa control properties  or add icons to a PopupMenu's items.

But wait, there's more!


This is getting pretty advanced now.

Cocoa is built on Objective C, which, contrary to C++ and Xojo, lets you get right down to the lowest level where you can call functions (called messages in ObjC) by name. From a String.

Which means that you can store the function name you want to call in a String, or even read it from a file, and then invoke it.

Here's an example to show you what I mean. The above code for setting the style could also be written like this:

  Declare Function NSSelectorFromString Lib "Cocoa" _
    (aSelectorName as CFStringRef) As Ptr
  Declare Sub objc_msgSend_int Lib "Cocoa" Alias "objc_msgSend" _
    (obj as Integer, sel as Ptr, v as Integer)
  
  dim f as String = "setBezelStyle:"
  objc_msgSend_int (me.Handle, NSSelectorFromString(f), NSInlineBezelStyle)

See how "setBezelStyle:" is stored in a string variable here?

This Cocoa control also has an "alignment", so let's try altering that as well. The function name to change the value is thus "setAlignment:" (the ":" at the end is important and specifies that the function gets one value passed to it). So add this code:

  dim f as String = "setAlignment:"
  objc_msgSend_int (me.Handle, NSSelectorFromString(f), 1)

And with that, we've right-aligned the text in the popup menu.

With this procedure, you could now define customizations for your Xojo/Cocoa controls by specifying the properties and values in a file, and generically assign those properties in your code, without the need to write a special case for every property you might want to change.

Demo project!


Click here to download a demo project using above techniques.

18 February 2014

iClip 5.1.2 with Search and "Smart Sets" now in beta

For the past few years I've taken over the development of iClip 5, a Clipboard / Pasteboard tool for OS X after the original author abandoned it to instead get insanely rich with selling iOS apps and organizing Bundle deals.

iClip is now again in beta testing. The new version adds a search feature that also lets you create smart search sets in order to see ony specific clippings, e.g. only those from a particular applications.

If you like to help testing iClip, even if you've never used it before, please sign up with MacDeveloper, then subscribe to iClip there. The MacDeveloper site helps us (i.e. me and the folks at Irradiated Software) manage bug reports and feature requests, and in return you as a tester can collect points in order to get the software for free if you don't own it yet.