Showing posts with label OS X. Show all posts

11 May 2019

Cloning APFS Volumes & Containers ("APFS inverter failed")

(This is an older article that I hadn't published back then because it might not be fully accurate, i.e. the steps may not be applicable. Yet, it contains some valuable information so I decided to publish it now. Read with a grain of salt. If you have corrections, don't hesitate to comment or email me.)

TL;DR

If Disk Utility fails to clone an APFS container, giving "APFS inverter failed" as error message, a work-around solution is to copy the partition with the "dd" command into a same-sized partition, then fix the cloned container's UUIDs.

About cloning (copying) entire Mac volumes

Usually, when you want to clone a Mac volume, you'd use Disk Utility's Restore operation. It performs a sector-by-sector copy (while skipping unused sector . The alternative would be to perform a file-by-file copy, as it's done by 3rd party tools like Carbon Copy Cloner.

A clone operation by copying individual files has several disadvantages over a sector copy:

  • It's much slower.
  • If you're using Finder Alias files, these may not work any more afterwards (that's because they rely on each file's unique ID, and those IDs change when copying files over to the destination).
  • More programs may request re-activation (re-registration).
However, when I recently tried to make an identical copy of my macOS Mojave system from my MacBook Air (2015), copying it to an external SSD, I ran into problems:

After the copy and verification operation was already apparently finished, an additional inverter process needs to be run on cloned APFS volumes. While I do understand that that's necessary when I copy only a single volume out of an APFS container, or copy the volume into a target APFS container without replacing it entirely, but even if I try to clone the entire container, with erasing the target, it still wants to run an inversion process - and that makes no sense to me.

Now, the error that I kept seeing is: APFS inverter failed to invert the volume

And I'm not the only one, see here and here.

I tried many things, including First Aid and removal of all snapshots, and running the cmdline tool "asr", which showed me more detailed error messages. Still, no success. I keep getting variations of the same issue.

What I'm showing now is a way to clone a complete APFS container (with all contained volumes) the way it should work.

How to clone an APFS container

Note: This may not work with encrypted volumes. Or it might. I have not tried.

We simply copy the entire partition (which contains the APFS container) sector by sector. (Small disadvantage over Disk Utility's Restore operation: This will also copy unused sectors, so it'll take a bit longer.)

Afterwards, we need to change the UUIDs of the cloned container and its volumes, or the Mac (and especially Disk Utility) may get confused when both the original and the cloned volumes are present on the same Mac.

Perform the sector copy operation

In case you want to copy your bootable macOS system, you will have to first start up from a different macOS system. If you have no other external disk or partition with another macOS system, simply start up from the Recover system.

When ready, connect the target disk, then start Terminal.app.


Get an overview of our disk names by entering (and always pressing Return afterwards):

diskutil list
Here's a sample output of my Mac that has four partitions, two of which use HFS+ ("AirElCap", "AirData") and the other two use APFS ("AirMojave", "AirHighSierra"):
/dev/disk0 (internal):
   #:                       TYPE NAME                    SIZE       IDENTIFIER
   0:      GUID_partition_scheme                         121.3 GB   disk0
   1:                        EFI EFI                     314.6 MB   disk0s1
   2:                 Apple_APFS Container disk1         40.9 GB    disk0s2
   3:                  Apple_HFS AirElCap                20.1 GB    disk0s3
   4:                 Apple_Boot Boot OS X               134.2 MB   disk0s4
   5:                 Apple_APFS Container disk2         39.8 GB    disk0s5
   6:                  Apple_HFS AirData                 19.9 GB    disk0s6

/dev/disk1 (synthesized):
   #:                       TYPE NAME                    SIZE       IDENTIFIER
   0:      APFS Container Scheme -                      +40.9 GB    disk1
                                 Physical Store disk0s2
   1:                APFS Volume AirMojave               20.7 GB    disk1s1
   2:                APFS Volume Preboot                 47.1 MB    disk1s2
   3:                APFS Volume Recovery                512.7 MB   disk1s3
   4:                APFS Volume VM                      2.1 GB     disk1s4

/dev/disk2 (synthesized):
   #:                       TYPE NAME                    SIZE       IDENTIFIER
   0:      APFS Container Scheme -                      +39.8 GB    disk2
                                 Physical Store disk0s5
   1:                APFS Volume AirHighSierra           23.2 GB    disk2s1
   2:                APFS Volume Preboot                 20.9 MB    disk2s2
   3:                APFS Volume Recovery                519.0 MB   disk2s3
   4:                APFS Volume VM                      3.2 GB     disk2s4

I plan to clone "AirMojave", so the disk identifier would be disk1, because that is the container for that volume. In your case it may be a different identifier. I will write the commands below using diskS for the source container and diskTsP for the target partition.

Now unmount all volumes of our source container. In Terminal, enter:

diskutil unmountDisk diskS
If this does not succeed, then you either have programs or files open on one of the volumes or you're trying to unmount the boot volume (in that case, you should have restarted into a different system as explained above). Do not continue if the mount was not successful or you're likely to end up with a corrupted clone.
diskutil apfs list diskS
+-- Container disk2 5099518D-36C0-47CC-B034-0CDA52C51CE8
    ====================================================
    APFS Container Reference:     disk2
    Size (Capacity Ceiling):      39838416896 B (39.8 GB)
    Capacity In Use By Volumes:   27042205696 B (27.0 GB)
    Capacity Not Allocated:       12796211200 B (12.8 GB)
sudo diskutil resizeVolume diskTsP size
In place of size, use the number that's show after "Size (Capacity Ceiling):".
diskutil unmount diskTsP
This is the command that will perform the copying:
sudo dd bs=1m if=/dev/diskS of=/dev/diskTsP

(See also Adrian's comment below, suggesting to use "rdisk" instead of "disk" for higher speed.)

While dd is doing its work, it won't show any progress on its own. And it can take hours, even days. To check where it's at, type ctrl-T in the Terminal window. That will print a line showing its current progress.

Fix the UUIDs

Enter in Terminal:
sudo /System/Library/Filesystems/apfs.fs/Contents/Resources/apfs.util -s /dev/diskT
You'll likely not get any response from this command, telling you success or failure.

To check whether the UUIDs have been changed successfully, enter in Terminal:
diskutil apfs list
In the output, find your source and target disks, and compare the UUIDs of their container and container volumes. They should all be different. If the UUIDs of source and target volumes show the same code, then the fix did not work. Try again.

Make the system volume bootable

The last step is to make the cloned volume bootable again (in case it was before). For that, you need to mount the Preboot volume, then rename the single folder inside, which contains the old UUID, into the new UUID of the main volume.

To mount it:
diskutil mount diskTsX
(X stands for the partition number containing the "Preboot" volume)

To show it in Finder:
open /Volumes/Preboot
Now you should see a Finder window with a folder named after the UUID of the original volume you copied. Rename that folder into the new UUID. To verify that you used the correct UUID, open System Preferences, Startup Disk, select the cloned bootable volume and click the Restart button. If it says that it can't bless it, you got it wrong. Otherwise, the system should now restart, meaning the UUID was correctly set to a bootable volume.

22 April 2019

Performance considerations when reading directories on macOS

(Latest update: 17 Feb 2025 (2), see end of text)

I'm developing (and selling) a fairly popular file search program for the Mac called Find Any File, or just FAF.

It works differently from Spotlight, the Mac's primary search tool, in that it always scans the live file system instead of using a database. This makes it somewhat slower in many cases, but has the advantage that it looks at every file on the targeted disk (whereas Spotlight skips system files by default, for instance).

My primary goal is to make the search as fast as possible.

Fast search built into macOS


Until recently, this went quite well, because Mac disks (volumes) were formatted in HFS+ (aka Mac OS Extended), and Apple provides a special file search operation (CatalogSearch or searchfs) for these volumes, by which FAF could ask for the file name the user is looking for, and macOS would search the volume's directory on itself and only return the matching files. This is very fast.

Unfortunately, with Apple's new file system APFS, and the fact that any macOS running High Sierra or Mojave got their startup volume converted from HFS+ to APFS, search performance has decreased by factor 5 to 6! Where searching the entire startup disk for a file like "hosts" did take just 5 seconds on a fast Mac with a HFS volume, it now takes half a minute or more on APFS.

Besides, the old network file server protocol AFP does also support the fast search operation, but only on real Mac servers - some NAS systems pretend to support this as well, but my experience shows that this is very unreliable. The newer SMB protocol, OTOH, does not appear to support searchfs.

Searching the classic way


When the searchfs operation is not available, unreliable or inefficient, FAF falls back to looking at every directory entry itself, looking for matches to the search, then looking at the contents of every subdirectory, and so on. This is called a recursive search (whereas searchfs performs a flat search over all directory entries of a volume).

There are several ways to read these directories. I'll list the most interesting ones:

  • -[NSFileManager contentsOfDirectoryAtURL:includingPropertiesForKeys:options:error:]
  • opendir() & readdir_r()
  • getattrlistbulk()
  • fts_open() && fts_read()

The first is the standard high-level (Foundation) function. It lets you choose which attributes (besides the file name) it shall fetch alongside. This is useful if you want to look at the file sizes, for instance. If you let them fetch along, it'll cache them in the NSURL objects, thereby increase performance if you call [NSURL getResourceValue] later to read the value.

readdir() is a very old UNIX / POSIX function to read a directory's file names, and nothing else, one by one.

getattrlistbulk() is a special Mac BSD function that's an extension to the older getattrlist(). It is supposed to be optimized for faster reading, as it can fetch the entire contents of a directory at once, along with attributes such as file dates and sizes. [NSFileManager contentsOfDirectoryAtURL...] supposedly uses this function, thereby making use of its performance advantage.

fts_open() is a long-existing BSD or POSIX function that is specialized on traversing directory trees. I've added this only after the initial tests, i.e. its discussion is a bit more brief below.

Test methods


I've tried to find out which of the various methods of reading directories, looking only for file names, is the fastest: I had to scan the same directory tree with every method separately.

Testing performance is a bit difficult because macOS tends to cache recently read directories for a short while. For instance, the first time I scan a directory tree with a 100,000 items, it may take 10s, and when I run the same test again withing a few seconds, it'll take only 2s. If I wait half a minute, it may again take 10s. And if I'm searching on a file server, that server may also cache the information in RAM. For instance, my NAS, equipped with Hard Disks, will be rather loud the first time I search on it, due to the HDs performing lots of seeking, whereas a repeat search will make hardly any noise due to little to no seeking, which also increases the search performance.

Therefore, I performed the tests twice in succession: Once after freshly mounting the target volume (so that the cache was clear) and once again right after. This would give me both the worst and best case performances. I repeated this several times and averaged the results.

I also had to test on different media (e.g. fast SSD vs. slower HD) and formats (HFS+, APFS, NTFS) and network protocols (AFP vs. SMB, from both a NAS and another Mac) because they all behave quite differently.

The Xcode project I used for timing all three scanning functions can be downloaded here.

Test results


Most tests were performed on macOS 10.13.6. The NAS is a Synology DS213j with firmware DSM 6.2.1, connected over 1 GBit Ethernet, and both AFP and SMB tests were made on the same NAS directory. The Terminal cmd "smbutil statshares -a" indicates that the latest SMB3 protocol was used. The remote Mac ran macOS 10.14.4, and the targeted directory on it was on a HFS+ volume so that I could compare performance between AFP and SMB (APFS vols can't be shared over AFP). I also did a few tests on the 10.14.4 Mac, though I only recorded the best case results as the others were difficult to create (I'd have had to reboot between every test and I wasn't too keen on that).

I was expecting that contentsOfDirectoryAtURL would always be as fast as its low level version getattrlistbulk, whereas readdir would be slower as it wasn't optimized for this purpose. Surprisingly, this was not always the case. (I did not include the fts method when I did this run of tests - its results will instead be discussed in a separate chapter below).

The values show passed time in seconds for completing a search of a deep folder structure. The values are only comparable in each line, but not across lines, because the folder contents were different. The exception are the network volumes, where the same folders were used for AFP and SMB.

The green fields point out the best results. The red one points out an anomaly.


contentsOfDirectoryAtURL
getattrlistbulk
opendir/readdir

worst casebest caseworst casebest caseworst casebest case
HD HFS+12.42.812.42.312.42.35
SSD HFS+4.92.84.62.264.62.47
SSD APFS11.210.6106.88.63.2
SSD NTFS28628684.7
10.14 APFS

12

10

8
10.14 HFS+

4.1

3.8

4
NAS via AFP5.62.54.82.145.62.7
NAS via SMB1515171595.7
Mac via SMB4.45.46.85.56.55
Mac via AFP5.33.65.13.75.94.3


Observations

  • HD vs. SSD shows that the initial search takes much longer on HDs, which makes sense because HDs have a higher latency. Once the data is in the cache, though, both are equally fast (which makes sense as well).
  • contentsOfDirectoryAtURL and getattrlistbulk perform equally indeed, just as predicted, with the latter usually being a bit faster once the data comes from the cache.
  • On APFS, NTFS and SMB, readdir() is significantly faster than the other methods, which is quite surprising to me.
  • SMB performance is worse than AFP (regardless, Apple declared AFP obsolete) in nearly all cases.
  • When accessing a Mac via SMB, contentsOfDirectoryAtURL is faster than the other methods, but only on the first run (see red field). Once the caches have been filled, it's slower. I can't make sense of it, but it's a very consistent effect in my tests.

The fts functions


fts_open() / fts_read() are, in most cases, faster than readdir()contentsOfDirectoryAtURL and getattrlistbulk. Exceptions are network protocols, where especially the retrieval of additional attributes makes it slower than the other methods.

Fetching additional attributes


When extra attributes such as file dates or sizes, are needed during the scan, the timing of the various methods changes as follows:

  • For contentsOfDirectoryAtURL and getattrlistbulk, there is little impact if these extra attributes are requested with the function call.
  • For readdir(), fetching additional attributes (through lstat()) turns it into the slowest method.
  • The fts functions are the least affected by getting attributes that are also available through the lstat() function if a local file system is targeted. However, for network volumes via AFP, they become about 20% slower in my tests, whereas getattrlistbulk stays faster.

Differences between macOS versions


When searching the same volumes (both HFS+ and APFS) from Sierra (10.12.6), High Sierra (10.13.6) and Mojave (10.14.4), I measure a consistent worse performance on Mojave. Meaning that scanning directories got slower in 10.14 vs. 10.13, by about 15%.

Also, getting additional attributes 10.12,  compared to 10.13 and later, takes about twice as long, across all methods. Which could mean that something improved in 10.13 regarding fetching attributes.

Conclusion


It appears that for optimal performance, I need to implement several methods, and select them depending on which file system or protocol I talk to.

Here's my current list of fastest method per file system:

  • HFS+: Always fts
  • APFS: Always fts
  • AFP: Always getattrlistbulk
  • SMB: If not attributes needed: readdir, otherwise fts or getattrlistbulk

Update on 29 Apr 2019


When traversing a directory tree, one must take care not to cross over into other volumes, which can happen if you encounted mounted file systems in your path, such as when you parse "/" into "/Volumes".

The safe way to check for this is to determine the volume a folder is on before you dive into it. To identify volumes is to get their volume or device ID. One way is to call stat(), then check its st_dev value, another is to get the NSURLVolumeIdentifierKey. Or, in the case of fts_read, it's already provided - which adds to its superior efficiency.

My testing shows an unpleasant performance impact, though:

When traversing with contentsOfDirectoryAtURL, calling stat() is less efficient than getting the value for NSURLVolumeIdentifierKey. That makes sense, because the stat() fetches more data, and that could cause additional disk I/O.

OTOH, the file system layer should know the ID of the volume without the need to perform disk I/O.

Meaning, getting the value for NSURLVolumeIdentifierKey should cost no significant time at all, because the information is known to the upper file system level, before even passing the request on to the actual file system driver for the parcular volume. Therefore the value should be readily available at a much higher level - regardless, fetching this volume ID takes about as much time as getting an actual value from the lowest level, such as a file size or date.

However, when I add fetching this volume ID to every encountered file & folder, the scan time increases by over 30%. Fortunately, for the scanning, one only has to fetch this value for directories, not for files, which makes this have a smaller overall impact. Still, the performance of this could be better if Apple engineering would consider this, I believe. After all, identifying  the volume ID is needed by almost any directory scanner.

Update on 11 May 2019


When discussing my findings on an Apple forum (actually, on one of the few remaining Apple mailing lists), Jim Luther pointed out to try enumeratorAtURL. And, indeed, this function does better than any of the others, at least with my tests on local disks, both on HFS+ and APFS. Like fts_read, it takes care of staying on the same volume, so that I do not have to check the volume ID myself.

I have updated my test project with the use of this function.

Update on 17 Feb 2025


I have further improved my DirScanner code by avoiding the creation of NSURL object unless necessary and fetching some properties (file size and mount point flag) more efficiently. This also fixes an issue where searching on the root volume would find items twice because it could dive into /System/Volumes/Data accidentally.

Another update later this day was made: NSURLs are now created more efficiently. The key to this is creating them not from NSStrings but from C-Strings using the fileSystemRepresentation initializer, thus avoiding the need for internal conversion operations.

New version of the Xcode project is available at the same location (see below).

Comments, concerns?


Feel free to download the Xcode project and run your own tests.

Comments are welcome here or on Twitter to me: @tempelorg

10 August 2018

Locating and updating symlinks and Finder Aliases with FAF

Today I renamed one of my internal disks in my Mac Pro. I then realized that I had created a few symlinks to that volume, and those would now become invalid.

For example, if the disk used to be called "Data" and is now called "Backups", then symlinks I may have created would still point to "/Volumes/Data/..." but need now point to the new name instead.

Since I knew that there would only be a handful of such symlink files on my other disks, I could easily update them by hand (using Terminal.app, with the "ln -s" command).

All I needed to do was to find all those symlinks first, making sure I would not miss any.

With Find Any File, this is quite easy. Set up a search like this:


To get the "File Type Code" option, you need to hold down the option (alt) key before clicking the popup-menu. Searching for files of type code "slnk" will address symlinks, and nothing else.

This will then find all matching symlinks, which you can then reveal in the Finder and manually update accordingly.

Similarly, you can also find related Finder Aliases, by searching like this:


After renaming a disk, updating Finder Aliases pointing to that disk is usually not necessary, because Aliases use redundant information to locate moved and renamed files.

However, if you should ever copy all your content to a new (larger) disk, file by file, Finder Aliases won't work any more if the targeted files have also been moved or their disk has been renamed.

So, it can't hurt to update your Aliases right away after moving or renaming the target item. To update your aliases, simply locate or reveal them in Finder, then select the Alias file and hit cmd+R to have it reveal its target. Should the target have been moved or renamed in the mean time, macOS will automatically update all the redundant information.

19 July 2017

APFS and fast catalog search

This is about FSCatalogSearch / searchfs support in macOS with the APFS file system.

Updated 3 Oct 2017: Find Any File 1.9 will support fast search on APFS on High Sierra (10.13) by using the searchfs function. Version 1.9 is currently in open beta, see the FAF web site.

Updated 25 July 2017: Clarified why FSCatalogSearch doesn't work on APFS, adds issue about hard links and 64 bit CNID resolving.

Some background on FSCatalogSearch in general


Programs like EasyFind and my own Find Any File (FAF) are able to search for file names (as well as file dates, sizes and a few other rarely needed attributes) on disks in a quite fast manner by using a little-known function macOS offers.

This Carbon level function is known as CatSearch or (FS)CatalogSearch and has been around for more than 25 years. There's also a BSD level function called searchfs.

The advantage of this function is that it performs the search for names at the file system driver level, meaning that when you search for files containing ".png" in their name, the file system can look at the entire directory tree much faster, sorting out the matches, and only report those to the program that initiazes the search and then shows the results to the user.

Without this special function, the search program would have to start at the root of the disk, read each folder (directory) recursively, and then sort out the matches itself, which all takes much more computing time.

For example, a search on a disk with millions of files and folders on it would take only a few seconds with FSCatalogSearch, whereas a classic recursive search would take minutes.

Getting even more technical


Apple added the FSCatalogSearch function in Mac OS long ago, after introducing the HFS file system. This was supported by the fact that  HFS did, unlike Window's FAT, arrange the entire directory tree in one large file on the disk, with interlinked nodes that did not match the hierarchical folder structure. FSCatalogSearch would then iterate over the nodes in a most efficient way, not caring about the folder structure, thereby minimizing disk seek times, which was a significant factor in disk access before SSDs. This also meant that FSCatalogSearch would only work on volume formats that used a single (invisible) file for its entire directory tree, meaning that FSCatalogSearch was never available for FAT disks, for instance. It would also be optimal for NTFS volumes, but since Apple never used NTFS other than to support reading from Bootcamp partitions, they never made the effort to add FSCatalogSearch to their NTFS file system driver.

What about APFS?


Now Apple is about to replace HFS(+) with APFS on macOS. And fans of EasyFind and FAF start wondering: Will I still be able to perform fast disk-wide file name searches the way I'm used to?

The good news is: The APFS file system code has support for the lower level searchfs function, and that's been already added in 2016, apparently, for OS X 10.12. Which ultimately means: Yes, FAF and EasyFind can continue to provide fast search on APFS formatted disks, provided extra work is put into updating the apps accordingly.

However, there are still some issues:
  • The high-level FSCatalogSearch does not work on APFS. Both EasyFind and FAF rely on this function and therefore won't find files the fast way on APFS volumes right now. The reason for this is that APFS uses larger values (64 bit) than HFS+ for identifying the files, and the FSCatalogSearch function cannot handle those larger values. (rdar://33454922)
  • As of now (10.12.6, 10.13 beta 3), the searchfs function does search case-sensitive and not case-insensitive as it should. That means that searching for ".png" won't find files using ".PNG". I confirmed this with an Apple engineer - it's a known issue, just one with a low priority right now. So, there's a chance that this will get resolved eventually, and I hope it'll be done before 10.13 is released. This issue may not get fixed for 10.12.x, though. We'll have to see what Apple does in this regard. (rdar://33455597)
  • Hard links can't be identified correctly - if there are multiple hard links to the same file, then searchfs can't currently tell them apart, and the results will all point to the same directory entry. (rdar://33473247)
  • searchfs() returns CNIDs (Catalog Node IDs, 64 bit wide) instead of paths to the found items. This requires resolving these IDs to the paths later. However, there is currently no documented API provided in macOS to do so. There's a hackish way around this, but that's not a proper solution. (rdar://33507188)

What this all means


Current versions of FAF and EasyFind can't fast search on APFS. They need to be rewritten using the searchfs API.

I will be working on a quick-fix version of FAF that'll add fast search on APFS and which I hope to release before 10.13 (High Sierra) is officially released. I have quite a few other improvements for FAF in the works (64 bit app, content search, icon view, server support etc.) which will have to wait so that I can get this APFS issue resolved ASAP.

24 March 2016

Using USB barcode scanners on Macs with Xojo

Barcode scanners translate 1D and 2D bar codes, such as Code128 and QR Code, into readable characters.

Usually, handheld bar code scanners with a USB interface simulate a keyboard by default. With that, they work out of the box: If you scan a code with such a reader, it'll send keyboard strokes to the computer.

This makes them easy to use, but it also causes some issues:
  • If you have a program that expects input from a scanner, you have to make sure the typed characters are properly caught by your program and not go somewhere they don't belong. E.g, if the user switches accidentally to another program and then scans a bar code, not only will your program not be able to get the code from the scanner, but the keystrokes may cause odd effects in the the program that's active then. It's like your cat walking over your keyboard and wonder what'll go wrong.
  • Even worse, it can pose a security threat. Hackers have been able to show scanners customized bar codes that contained key strokes that would lead to remote controlling computers that the user was not supposed to access that way. Imagine a so-called "kiosk" terminal that's supposed to run only a particular application but gets quit by a alt-F4 or cmd-Q keystroke, then opening another program such as a Terminal to mess with the computer. In other words, using a bar code scanner in the "keyboard emulation" mode opens the computer to all kinds of abuse that you may have wanted to prevent by not giving the user a keyboard and mouse.

One way to prevent these issues is to put the scanner into a mode where it does not emulate a keyboard any more. That mode is usually called a "HID POS" or "USB OEM" mode. In such a mode,  the software needs to run special code to communicate with the scanner directly. Another option would be to not use the scanner's USB interface but rather use a serial interface (many scanners can be used with either) and then use a Serial-to-USB adapter to connect the serially operated scanner to the Mac or PC.

In case you want to use the USB HID POS mode with a scanner (e.g. GoDEX models), I've posted some details and a demo project on the Xojo forum a while ago: https://forum.xojo.com/24557

In the meantime, I've also managed to scanners from Datalogic (Gryphon 44xx models) and similar scanners using the sparely documented IBM / Toshiba "OEM" USB protocol. If you are interested in supporting those, contact me directly.

21 September 2015

New: OS X Automator Action plugin for invoking Services

When I started adding Services to my apps (Find Any File, iClip), I realized that this was not enough for users who want to write workflows with Automator or Applescript because there seems to be no way to invoke Services from Automator nor AppleScript.

So I wrote an Automator Action that allows you to run any Service that operates on Text or Files & Folders:


Find instructions and the downloads on github (including Xcode source).

License is unrestricted, i.e. totally free.

08 January 2015

OS X Kernel Hacking (fixing the psignal kernel bug)

At the German Macoun conference in Oct 2014 I gave a talk about rootkits and hacking the OS X kernel.

This article is a summary and follow-up on this topic.

Introduction


Since Yosemite (OS X 10.10), kernel extensions (KEXTs) need to be code signed or they won't get loaded any more. The code signing certificate needs to be optained from Apple, and it's not easy to get it - and even if you have one - once you do something with it that Apple doesn't approve of, they can simply invalidate it, preventing further use of KEXTs signed with that certificate.

As usual for Apple in recent years, we developers (at least in my case who received said certificate from Apple) are not told clearly what would be acceptable by Apple. Clearly, Apple should use this to block malicious software from getting installed (such as rootkits and "jailbreaks" that undermine the security of the user's data and resources). But what about things that benefit users but that Apple simply does not agree with due to their desire to control everything lately? Is patching bugs allowed? Is patching features allowed as long as it's desired by and beneficial to the users, with their express agreement? We don't know. But we'll find out a bit of that, I guess. See below.

It is possible to disable the signing requirement for KEXTs, though. This is done by setting a particular firmware parameter (see this StackExchange answer for instructions) on the computer where you like to load an unsigned KEXT. This setting is meant for developers so that they can test their KEXT without having to sign it each time (besides, performing code signing requires an internect connection, which may not always be available). But users can apply this setting as well, of course. For example, anyone having installed a 3rd-party SSD into their Mac may want to install a patched version of the disk driver in order to have TRIM support enabled (Apple only enables it for their own drives by default).

Patching a little bug in the Kernel


There's this bug in the kernel that affects signal handling in threads. The author of the article, Russ Cox, shows how to patch the kernel file on disk to fix this bug. That is a bit dangerous because, when one makes a mistake and tries to boot this system, the Mac may become inoperational, and fixing this is a bit tricky. Also, it's not everyone's pleasure to patch the kernel the way.

I now like to show how to perform the same patch dynamically, from within a kernel extension. The advantage of this procedure is that it can be enabled and disabled at will, simply by loading and unloading the KEXT. As it doesn't modify the kernel on disk but only updates it in memory, it should work with future kernel updates as well, patching the bug in there as long as it hasn't been fixed by Apple. Should the bug not be found by the KEXT, then the KEXT simply quits and doesn't alter the system further.

To make this work several 3rd party components are used:

1. For locating non-exported kernel symbols in memory: The Flying Circus framework.
2. For locating the to-be-patched code in possibly any kernel version without having to know the exact location or code for each kernel release. This is accomplished by using the diStorm3 disassembler.

The entire project can be downloaded here:
http://files.tempel.org/OSX-psignal-fix/OSX-psignal-fix.zip

It contains an Xcode project with two targets: One builds the KEXT, the other builds the test program as provided by Russ Cox on this website. It also contains a readily usable KEXT signed with my own certificate.

To install the psignal fix into your OS X system, open Terminal and issue the following commands:

cd /path/to/OSX-psignal-fix-folder
sudo chown -R 0:0 psignal-fix.kext
sudo kextload psignal-fix.kext

That should have installed the patch. If you got an error, open Console.app and look for error messages containing "[psignal-fix]".

If you're happy with the functionality of the fix, you may also simply place it into /Library/Extensions/ and reboot to load it permanently. You have have to issue the chown command again after copying the kext to that folder, though.

To unload the KEXT, issue this command:

sudo kextunload psignal-fix.kext

If you have Xcode installed, you can also run the test to verify that the patch works. Open the project and select the "psignal-test" target from the popup menu in the window title. Run it and see its console output. This is the essential output without the fix:

...
500 signals received.
500 on main
0 on looper 0
0 on looper 1
0 on looper 2
0 on looper 3

And this is the output with the fix working:

...
500 signals received.
0 on main
129 on looper 0
123 on looper 1
128 on looper 2

122 on looper 3

The difference is that with the fix intact, the signals will occur nearly evenly distributed on all looper threads and none on the main thread.

If you build the KEXT (target "psignal-fix") yourself, you need to disable the KEXT signing requirement first if you're on OSX 10.10 or later, unless you have your own KEXT signing certificate, of course.

References


* Disable KEXT signing requirement : http://apple.stackexchange.com/questions/163059/
* Trim Enabler: http://www.cindori.org/software/trimenabler/
* Description of kernel bug: http://research.swtch.com/macpprof
* The Flying Circus: http://www.phrack.org/papers/revisiting-mac-os-x-kernel-rootkits.html

04 November 2014

Find Empty Folders - a free OS X tool

Today someone asked me if I knew a way to find and delete empty folders, even if they contain an invisible .DS_Store file.

I googled and found nothing.

So I quickly whipped something out with Real Studio.

The result can be found here:

http://www.tempel.org/FindEmptyFolders

18 July 2014

Something adventurous for a change (Nelly Cootalot)

Today I'm just helping promote someone else's work.

With this blog being directed mainly to other (programming) geeks, I think you might even be the right audience:

Did you enjoy playing Monkey Island, Leisure Suit Larry and other funny point-and-click adventures? (Though, the first Larrys I played were running still on DOS, without mouse support.)

And do you enjoy british humour?

And, possibly, are you on Steam?

Then have a look at this hilarious Nelly Cootalot promo!

The game is designed by a british film maker, and it's not his first go at an adventure, however this one is made much more professionally. Support his quest for getting the game onto Steam - don't be a coward!

I support this because long time friends of mine are involved in the development and distribution, and at some time I was almost becoming part of the dev team as well. I'd have loved to but I'm already busy with so many other projects I couldn't take on another one.

The game already got its basic funding through Kickstarter earlier this year, and now this is a step up to get onto Steam, giving it a much wider reach.

Also, it'll run on Macs, which is always good.

07 July 2014

OS X: Moving Files to Trash from your own application, with optional user interaction!

When you're writing a interactive Mac OS X program, it's possible that you need to delete files.

And if they're files the user has access to, then it's often a good idea to move them to the trash instead of erasing them right away, in order to give the user the opportunity to restore them again (saving you the need to provide some kind of Undo command for the destructive operation).

Moving items to the Trash is rather complex, and so it's best to just let the Finder perform that task.

The Finder is, fortunately, still scriptable, and so this task should be easy. (I must say, though, that I don't know if you can get such an app into the App Store - if you know, please comment.)

The challenge is to have the Finder tell the user if there's a problem, such as when the item is locked or when an admin login is needed.


Now, if you're trying to be lazy, you'd just write an AppleScript and invoke that from your application (this is especially easy to do in Real Studio / Xojo, but not much harder in ObjectiveC, either).

The downside of using an AppleScript is that it won't show these dialogs - if the item can't be moved to the trash, the function will return and give you an error message telling you about the problem.

To solve this, you need to invoke the AppleEvent directly, without going through an AppleScript.

The Xojo code would look like this, simplified:

  dim ae as AppleEvent = NewAppleEvent ("core", "delo", "MACS")
  dim list as new AppleEventDescList
  list.AppendFolderItem (theItemToDelete)
  ae.DescListParam("----") = list
  ok = ae.send

However, this won't give us the user interaction either, yet. That's because Xojo's Send command is lacking the options that the OS X API offers.

We have to call the native AESend() function via a declare, instead:

  const kAEWaitReply = &h00000003 ' sender wants a reply and will wait
  const kAEAlwaysInteract = &h00000030 ' interact where appropriate
  const kAECanSwitchLayer = &h00000040 ' interaction may switch layer
  declare function AESend lib "Carbon" (ae as Integer, reply as Ptr, 
    sendMode as Integer, prio as Integer, timeoutTicks as Integer,
    idle as Ptr, filter as Ptr) as Integer
  dim sendMode as Integer
  sendMode = kAEWaitReply + kAEAlwaysInteract + kAECanSwitchLayer
  dim err as Integer = AESend (ae.Ptr, nil, sendMode, 0, 0, nil, nil)
        
The same can be applied to copying files with user interaction as well - use the "clon" instead of the "delo" value for the AppleEvent.

I've made a REALbasic / Xojo project with both a MoveItemsToTrash() and CopyItems() function for your own use. Download here.

26 March 2014

Customizing Xojo's controls on OS X with Cocoa

This article is about some advanced techniques for Xojo users that write OS X Cocoa apps.


If you are using Xojo to build OS X Cocoa applications, you can customize the controls much further than Xojo offers directly.

Let's take the PopupMenu. It's fairly limited in appearance (one look only) and capabilities (no icons in the menu, for instance).

Changing the appearance of such a control is easy because for most of Xojo's controls there is a Cocoa control equivalent, and you can directly alter those Cocoa controls from your code.

First, find out what you like to change in a control. You could look up Apple's documentation for the NSPopupButton, for instance. An easier way is to use Xcode as you can then see immediately the results in Xcode's interface designer.

Get Xcode from developer.apple.com, launch it, and choose New Project... from the menu.
Choose OS X - Application - Cocoa Application. Click Next. Give the project a name and check "Create Document-Based Application". Click Next and save it, e.g. to the Desktop.

In the browser menu on the left, select "Document.xib". That will show you the window editor, similar to Xojo's layout editor.

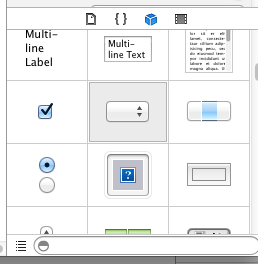
At the right of the Xcode window, at the bottom, there is a list of controls to choose from:

Find the "Pop Up Button" and drag it into the layout window. The window should then look like this:


Click on the added button to select it, and on right side of the Xcode window, click on the properties button (the one shown in blue here).

You will see the various properties you can alter.
For example, let's change the Style to Inline. Do that and see how the appearance of the popup menu changes:


Now let me show you how to do that in your Xode program.


I assume you know how to add a PopupMenu control to a window in Xojo.

Add an Open event to the PopupMenu in the window, and add the following code:

  Declare Sub setBezelStyle Lib "Cocoa" _
    Selector "setBezelStyle:" (obj as Integer, v as Integer)
  
  const NSInlineBezelStyle = 15
  
  setBezelStyle (me.Handle, NSInlineBezelStyle)

If you run your Xojo project, the popup button should now have the changed appearance.

However, it might be that the up+down arrows are centered, not on the right as they should. If you look at the Xcode project and play around with the settings for the Popup control, you'll see that the Arrow property controls this - if it's set to "Center", it's placing the arrows in the center. Let's see if we can fix the Popup menu in Xojo to have its Arrows set to "Bottom" instead. Add these lines:

  Declare Sub setArrowPosition Lib "Cocoa" Selector "setArrowPosition:" (obj as Integer, v as Integer)
  Declare Function cell Lib "Cocoa" Selector "cell" (obj as Integer) as Integer
  
  const NSPopUpArrowAtBottom = 2
  
  setArrowPosition (cell (me.Handle), NSPopUpArrowAtBottom)

Now I'll explain what's going on:

setBezelStyle is a function of NSButton, which is the super class of NSPopUpButton. Unfortunately, Xcode does not tell us that its "Style" property is actually called "bezelStyle", so I had to search the documentation for it anyway. me.Handle is the Xojo control's reference to the Cocoa object (i.e. the NSPopUpButton object), and we've then declared a Xojo function with the name setBezelStyle that invokes the "setBezelStyle:" selector, passing it an Integer value. Note that for every Cocoa property you find, there is always a setter function named after this pattern, e.g. "name" -> "setName:".

Getting access to the Arrow property was a little more complicated. Neither NSPopUpButton nor any of its super classes provides a function to set this property. Instead, it's found in the NSPopUpButtonCell class. To get to values of this class, we need to use the cell function (found in the NSControl class).

If you do not like to figure all this out yourself, you can also take a look at MacOSLib or use the MBS plugins. Especially with MBS it's very easy to acess these Cocoa control properties  or add icons to a PopupMenu's items.

But wait, there's more!


This is getting pretty advanced now.

Cocoa is built on Objective C, which, contrary to C++ and Xojo, lets you get right down to the lowest level where you can call functions (called messages in ObjC) by name. From a String.

Which means that you can store the function name you want to call in a String, or even read it from a file, and then invoke it.

Here's an example to show you what I mean. The above code for setting the style could also be written like this:

  Declare Function NSSelectorFromString Lib "Cocoa" _
    (aSelectorName as CFStringRef) As Ptr
  Declare Sub objc_msgSend_int Lib "Cocoa" Alias "objc_msgSend" _
    (obj as Integer, sel as Ptr, v as Integer)
  
  dim f as String = "setBezelStyle:"
  objc_msgSend_int (me.Handle, NSSelectorFromString(f), NSInlineBezelStyle)

See how "setBezelStyle:" is stored in a string variable here?

This Cocoa control also has an "alignment", so let's try altering that as well. The function name to change the value is thus "setAlignment:" (the ":" at the end is important and specifies that the function gets one value passed to it). So add this code:

  dim f as String = "setAlignment:"
  objc_msgSend_int (me.Handle, NSSelectorFromString(f), 1)

And with that, we've right-aligned the text in the popup menu.

With this procedure, you could now define customizations for your Xojo/Cocoa controls by specifying the properties and values in a file, and generically assign those properties in your code, without the need to write a special case for every property you might want to change.

Demo project!


Click here to download a demo project using above techniques.